tereo
Tutorial
Notes by
Richard
Grotjahn
|
|
Stereo
Tutorial
N |
I make what are sometimes called "relaxed eye" stereo pairs. (i.e. you do not cross your eyes). This page presents instructions for creating as well as viewing this type of stereo imagery. The tutorial includes: tips on making stereo images using computer graphics or by using a regular camera. Also presented are tips on projecting the images. Finally, I have a tutorial on seeing the stereo effect without a viewer.
The tutorial is followed by links to pages with more examples. The background and some other non-essential aesthetic items were designed to be viewed using Netscape viewers. However, the stereo effect should be apparent on other viewers.
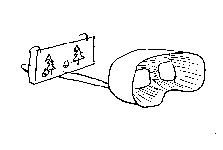
Stereo images can be created on a computer or using a regular camera. When using a computer, think of the subject as being viewed from two points on a circle that is centered behind the object. The two points correspond to the locations your two eyes would have if you were looking at a real object. The diagram below illustrates the principle, though I have drawn the circle centered on the object, which doesn't quite work (see next paragraph). I refer to the angular separation between the two eye positions as the compass angle. To get a stereo effect, this angle does not need to be large. For the graphics programs I have used, 2-3 degrees separation is all that is needed.

*Please note:
The diagram above shows the circle centered on the object
(the object being a "box"). If done that way, then the object can
appear properly 3-dimensional on the foreground side but "inverted"
on the background side. (In the "old days" of my youth, computer graphics
programs often placed the object in the center by default, that is why
I drew it that way.) It is important to note that the locations of the
two pictures
you take defines a line and that line must be perpendicular
to the object you want to view in stereo. If not perpendicular,
then there will be more eye strain because one image of the object
will be larger than the other image and the mind will have a tough
time mergin the images.
The third picture below is a better
guide for what to do.
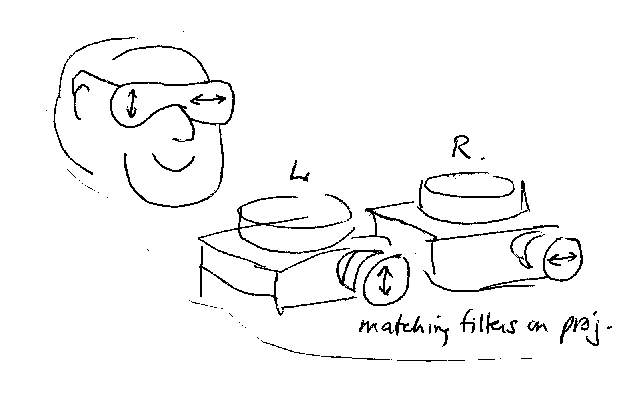
To see the stereo effect, one can use a pair of slide projectors in conjunction with polarizing glasses. (There are a dozen other techniques, several of which only work for monochrome images. I shall only describe the most common technique here.) The arrows in the diagram below indicate that the polarizers in the glasses match the polarizers on the projectors. And, the polarizers are crossed between each eye, and between each projector. The net effect is that each eye only sees the image projected by one projector. You need to project onto a surface that does not depolarize the light. Neither a white screen nor a granular "crystaline" screen will work. A standard "silver" screen works fine. If such a screen is not available, you could make one by spray painting a surface with silver paint. (A non-glossy silver works best.)
You can also take stereo images with a regular camera. The diagram below illustrates the basic technique. You take the pictures in rapid succession (so that things do not move between shots!) You choose some object in the scene to be in the same place in the viewfinder in both shots. I find that the best object to choose is the furthest one from the camera. In perspective drawing you will be familiar with this as choosing the vanishing point to be a particular object. If you choose an object in the middle distance, you might get weird perspective effects which are sometimes amusing, but usually not.
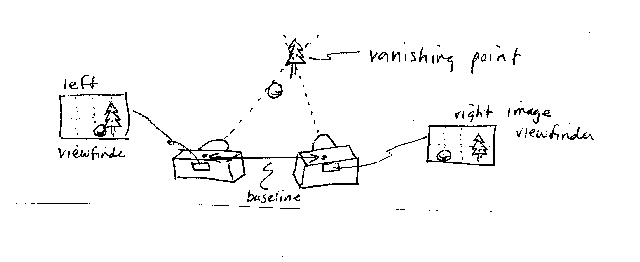
My favorite unusual effects are to vary the separation between shots. I refer to the distance between the lens positions for the left and right shots as the 'baseline'. Since there is typically 7 cm distance between the pupils of your eyes, your "anatomical baseline" is 7 cm. I've used very large baselines (100's of meters) when shooting out of a plane. This exaggerates the stereo effect allowing you to see the structure of clouds, landforms, etc. more clearly. A large baseline is as if you were a giant, with eyes separated by the baseline distance. Alternatively, you can view this as keeping your true eye spacing but looking at small "model" of the object being photographed. I call this effect miniturization, since buildings look like an architect's model.
(Again, the line defined by the baseline must be perpendicular to the objects you want to see in 3-D. So, if you are shooting out of an air plane, you are taking photos of things 'straight out' from the plane, not ahead or behind the plane.)
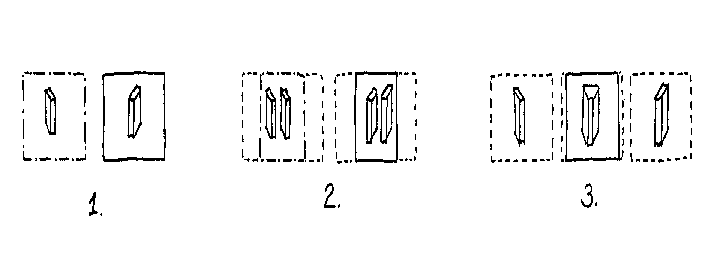
Finally, I have taught several people how to see stereo without using viewers, special projectors, etc. The idea is to train each eye to look at a different image at the same time. Once done, your brain will merge the images. Because our brains are so atuned to seeing in stereo, a 3-dimensional image will be formed. The diagrams below show how this could be done by holding the right eye image in the right hand and the left eye image in the left hand. For a web page, you want each eye to only see one image, but each eye sees a different image. If held in a hand, the images would be held up to a uniform white surface (irregular illumination makes the process more difficult and causes eye strain). Next, relax your eyes in the way that might happen when you are really tired and are "seeing double". (This is allowing your eyes to see independently.) Next try to get the inner member of each pair of "double" images to merge into one image, so that it looks like you are holding up 3 images. This trick is easiest to do if you don't try to focus until you have the illusion of seeing 3 images (when there are only 2 images). Now try to bring the middle "image" into focus without loosing the illusion of 3 slides. This is hard to do the first few times (people I've taught have taken from 1 minute up to 45 minutes to accomplish this focusing step). Only the middle image will have a stereo effect.
That describes 'relaxed eye' stereo viewing. For that you ONLY use the left and the middle image on my web pages.
There is another technique, called 'crossed eye' stereo viewing. For this technique you ONLY use the middle and right image on my web pages. It is common for people to use a figure pointing upwards for crossed eye viewing. The finger is between you and the images. (e.g. between you and the computer screen) The idea is that by looking at your finger, your eyes 'cross' at that finger, so: the right eye sees the middle image in the background behind your finger while your left eye sees the right image in the background behind your finger. When you lower your finger your eyes each see a different image and merges them.
So, you can see why I have 3 images to accommodate people who use either technique. If there are only 2 images, then that is only the relaxed eye technique.
One last tip: it is easier to do the stereo merging of images when the images are smaller (so the distance between where the eyes look is smaller). It is possible to reduce the image size on some web browsers by repeatedly tapping the 'control' and 'minus' keys simultaneously. Give it a try with the pictures on this page! Good Luck!
A list of stereo-related internet addresses (incomplete!)
For more stereo images, I have set up a couple of other pages. They are grouped by general subject. Each group listed below consists of about a dozen PAIRS of images. Each image has from 13 to 54 k bytes. Most are under 20 kb. As with the images above, they are small in size to keep the total file size small.
Return to my homepage.
Return to UCD Atmospheric Science
home page.